Monday, 2 November 2015

Year Two AAA Asset Initial Ideas and High Poly Model

For one of the projects we were assigned for this year we were tasked to make a three dimensional model, firstly I decided to make a mood board based on the objects I could of created, I began to look at objects such as tanks and other vehicles but decided against that to move onto an object that was smaller and slightly less complex, after deciding this I moved onto looking at weapons and smaller firearms, I looked at larger machine guns but eventually decided upon a Mk.14 EBR Rifle, currently used by the US Army as a standard marksman rifle, meaning there would be lots of pictures and reference for me to use.

After looking through pictures and references of the weapon, I decided on using an accurate graphic drawing for the reference weapon from a side view whilst modeling, (shown below) the side profile of the weapon would make it much easier to lay out the parts and get them all to the correct scale.


After setting my Maya settings accordingly and setting my project to the correct area I moved onto creating the first component of my weapon and arguably the simplest, the magazine, I began by using the quad draw tool to create the basic shape of the cuboid I was about to extrude and added edge loops around the edge of the 3D Object to refine more detail into the magazine, I then used bevels and the multi-cut tool to make sure I had to correct topology for smoothing the object correctly. I have included below a shaded, shadedwireframe and wireframe view of the magazine.


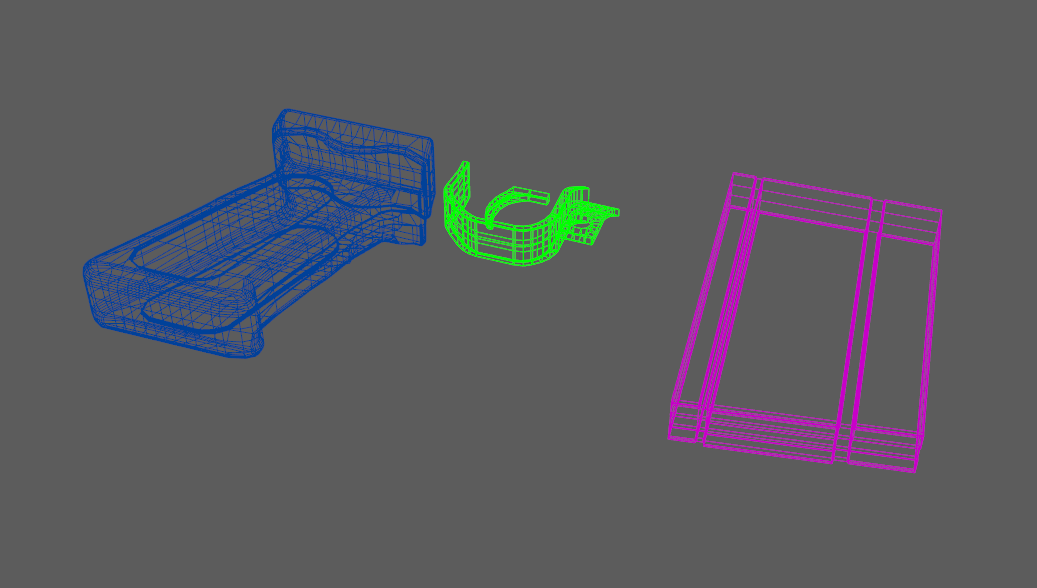
After the magazine I moved onto a more complex part of the weapon, the handle and trigger, I decided upon this part of the firearm first due to its more organic nature as I knew I would have to spend more time on this than other parts, again I begun by using the quad draw tool to mark out the area of the handle grip and trigger and extruded the basic shape up just like with magazine, I then used some more extreme bevels to mark the correct smoothness of the weapon and moved onto creating edge loops to make out the basic topology of where the textured part of the grip should go.



Making the stock was the next part of the modeling process, I began by using my now most used tool in the project the quad draw tool to create the ruberised section at the end of the weapon commonly used to absorb shock to the arm whilst firing, I smoothed it out using the bevel tool to make it look more rounded and soft and extruded parts off of that to make a section to connect it to the more hard surface areas of the stock, I then moved onto creating those areas by mapping out the basic areas using again, the quad draw tool and beveling off edges and moving the topology to create something that looked identical to the reference. Finally I used the cylinder tool to create the part of the stock that connects to the main receiver and grip and beveled off any edges to help with smoothing.


The scope was then the next part of the weapon, I began by using the cylinder tool to create the basic width of the shape and added edge loops so that I could bring in and out certain areas of the scope making it look more like the reference image after that I used two flattened spheres to make the lenses of the scope and used the quad draw tool to make the part the attaches the scope to the upper rail. 


After the scope I moved onto the barrel of the gun as it was made using a similar method, beginning with a thin tube I made edge loops and extruded off of the shaft to create ridges in the barrel, I then used the quad draw tool to create the sights, I removed some faces for the muzzle break and connected the exterior polys to the interior using the fill hole function and the bridge tool, I then beveled the edges to create the muzzle break.

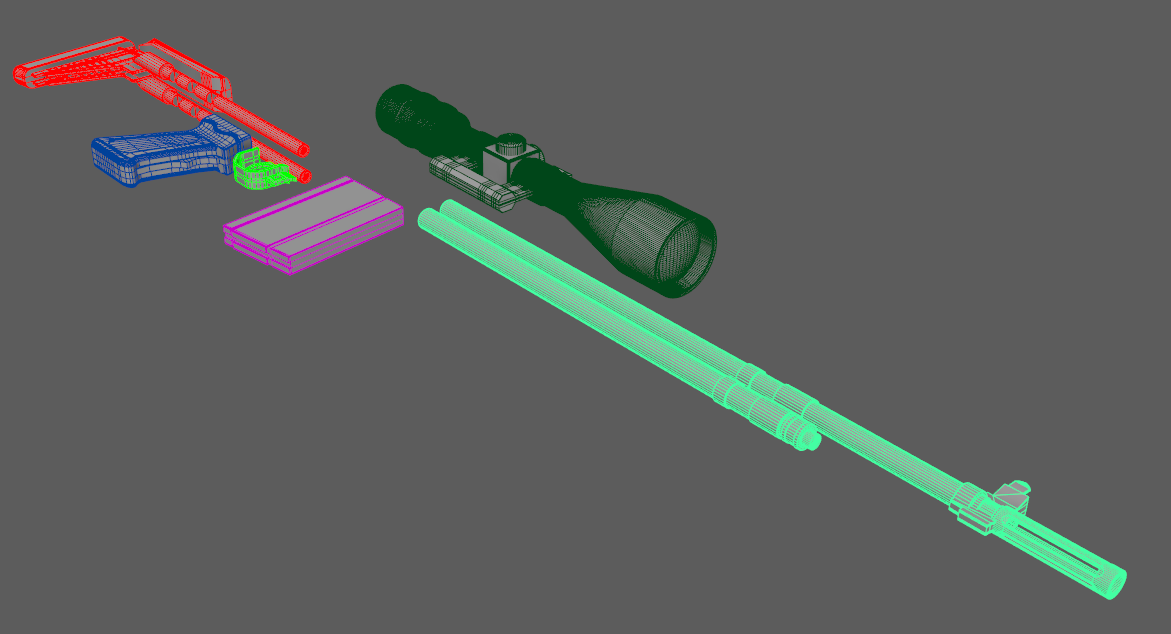


The next section of the weapon was to make the front rail and the scope rail, this was again used using the quad draw tool and extrusions, after the extrusions I made an edge loop through the center and moved the notches down to create a slight canyon to the rail and then used the edge loop tool to create areas where holes could be made. After creating the holes I then beveled the edges and smoothed off certain bits to make it look like the reference image.


Finally I moved onto making the main part of the weapon, the receiver, I made this out of three different pasts as it was easily the most complex part of the weapon in terms of modeling it, I began by using the quad draw tool to map out the basic topology and extruded to make the object three dimensional, I then used the edge loop tool and the extrude tool to add detail, I finally moved onto adding bevels to smooth out the rough areas. 


Here is some more glamour photos of the final model


~


Friday, 27 March 2015

Character Model

For our modeling assignment we were tasked to model and texture a character using given source materials. I started off with the feet of the model and sculpting the boots and then working into the legs, I looked online for other low poly models to have a look at their topology in order to get general layout right. 


Overall my total face count was 992 and my final UV map looked like this:


Frogman Warrior Concept

For this work we were tasked to design a frog humanoid. The frog had to be tropical and had to be anthropomorphic. For my design I worked with the idea that it could be an NPC or player in an MMORPG or RPG. I first started by looking up different frog picture and designs that others had done and then decided to draw some sketches of frogs. After that I worked on a silhouettes of a frog warrior and a frog wizard and decided to stick with the warrior as it had the better outline and feel to it.


Game Submission - Galactic Gaurdians


Over the past few months we have been assigned to work on a game in groups, the brief read that we had to work in teams of 3 or more and the game had to include a highscore system, flying and shooting. Our final build consisted of 27 scripts and over 1GB worth of assets over 4 different scenes with different planets. The enemy included a script which allowed it to chase the player and try to collide with it and the main player ship included a boost function with a smooth camera to follow behind the ship.


Above is a screenshot from the game showing the ship in motion, the GUI is clear and gives you information about what the ship is doing as well as your final score in the level, the main objective whilst in scenes like these is to survive as long as possible. Enemies spawn in groups of 5 every 30 seconds. We chose this amount to slowly add more enemies to the scene as time progresses making the game naturally harder as time goes on. 


Enemies have a distinctive pink trial behind them to make it easier to discover where they are, they move sightly slower than the player ship and rotate slower to make them easier to hit considering they have a tendency to try to get behind you when trying to hit you, to further make the game feel faster the enemies only need to be hit once to destroy them.


Above is a screenshot showing another variant of the level showing an earth-like planet, the score feature counts up in increments of 50 based on how many enemies you have killed. when you get back to the main menu the highscore function updates and keeps track of your score during that play session of the game. 


The main parts of the game I worked on was the modeling and scripting, I made the hard surface models such as the player spaceship and main menu in Maya 2015 and the more organic looking ships like the alien spacecraft and the planets were box modeled in Maya and then brought into Mudbox to add further detail. 


The main menu is the main hub of the game, after each level you are returned to the screen and are able to quit from there or play another level, Occasionally ships fly past to make the scene feel more dynamic and natural. To model it I took inspiration from real spacecraft and used similar screens and controls that are found within them. All the colour and texture work for the menu was done by another member of the group I was in.


To return to the menu in mid-game the player can just hit the escape key to bring up the in game menu and press quit, players can also restart the game or return to the game by pressing the relevant buttons. Quitting to the menu will save your score in the high-score function but restarting will reset as you didn't choose to stop playing.


Above shows some of the scrips I worked on when making the game these include inverted controls of the game to help test different control types in the editor as well as a function to destroy the ship if you stay near a planet for long enough. 


My favorite part of the game was modeling the ship in Maya, I tried to include as many small details as I could in order to make the ship look much more realistic. The final poly-count for the ship was over 100k however this was reduced for the game through the deletion of faces that weren't visible. 
If I was to do anything differently I would of added more fine details using bump/normal maps as well as do a better job of unwrapping for texturing. 


The main art piece I worked on was the diffuse map for the enemy ship, the initial concepts for the ship made it seem like an organic living thing rather than the player ship which was much more industrial and rigid.


The final GUI shown in the image above shows ship status and a score box. The original is shown above the heat warning image. We decided to use a different more clear GUI to remove the possibility of the GUI obstructing the player view.

Overall I feel that the game turned out positively, I would of liked to have done a little more to the game but I feel that with what we have got we have done well. If i was to change anything next time I would stick to an initial idea more and perfect that as the game play isn't that strong. 

Friday, 13 March 2015

Steampunk Rivet Gun

We were tasked to design a steampunk drawing, for my drawing I used a technique known as a paint over. I began by getting inspiration from steampunk images and tools and then moving onto Maya to create a model using different parts of steampunk images.


Thursday, 12 March 2015

T-REX UV Unwrap

For this session we learnt about unwrapping UV textures, to do this we first modeled a T-Rex. After modeling the dinosaur we then had to use the split UV tool to separate the UV's. The final model is shown below and the UV Unwrap is below that.


Friday, 6 March 2015

Street Scene

This is a street scene we were asked to texture. To do this we used photoshop as well as the UV Snapshot tool to create the textures for the scene. My final textures brought the scene to life and made it look less plain.